DIY-Finder/Guide Scope

Wanna make a scope? Or better still, grind a mirror yourself. Or, you have some good tips in making a really useful accessory? This is the place to show what your hands can do...
User avatar
timatworksg
Posts: 767
Joined: Mon Feb 01, 2010 9:42 pm
Location: Pasir Ris

DIY-Finder/Guide Scope

Post by timatworksg »

I've been meaning to DIY the above mentioned for some time, but never knew where to start! Till my cheapo 7X50mm Bino went broke! I removed the objectives and the eye pieces and decided it was finally time to try my hand at this. Purchasing a 9x50mm Finder scope would have been a better option, but cost was the obvious factor. Besides the fun at building something, regardless of whether it works or not, is the BEST part really! In the end I spent $5.00 max!

- 50mm UPVC tube (bought x2 half meter lengths)
- 50mm UPVC joining collar
- 40mm UPVC joining collar
- 40mm 'grey' UPVC reducing collar with threads to accept a 1.25" reducing collar that screws in.
- 'Grey' UPVC 1.25" collar that threads into the above
* Well stocked Hardware stores sell these. You can mix and match as you please to get a good fit. What I list here is what worked for me. By all means change it to suit your needs!

So here is my DIY Finder/Guide Scope. Must apologize for the pic quality and the in-between process. When I started the building stage, I was too excited and forgot to take pics!! But I'll be as detailed as I can so get the idea. Lastly, my methods were simple and crude...hehe! More fun that way!

==========================================

Getting focus was done the simple way. The lens was shoved into the collar, which has a thin rib on the inside. So the lens sat nicely halfway down. I then rolled up some cardboard, taped it to form a tube and cut the length to about 180mm. Strapped a steel ruler againts the collar with the cardboard tube inside and pointed it outside my window. Taking a white paper card, I checked focus where an image is projected clearly on the white card. Took the measurement and +/- 10mm either way since I have a threaded scope end which I can screw in/out to get good focus.

1. The odds and ends! 50mm UPVC tube length, 50mm UPVC collar and the bino objective. I pasted a thin strip of 3M velcro around the lens housing to have a snug fit into the collar piece. Below the lens is the rubber Bino lens cover which I can also use to cap the scope!

Image

2. The 50mm UPVC tube cut to length and shoved into the 50mm collar. It was a snug and tight fit, so slow gentle hammer taps were needed as the friction and any misalignment from a hard whack, can crack the collar! The collars have a thin rib on the inside so the tube shoves in and stops halfway nicely. In the pic you see the Guidescope with the collar painted black. The other one is gonna use the other bino lens and EP to make a small scope for my daughter, Pink in color!!!

Image

3. The rear end of the scope. The grey end, is the 40mm 'Grey' reducing collar that is threaded on the inside. This 40mm reducing collar was knocked into the 40mm joining collar. Then the whole unit was gently knocked into the 50mm PVC tube rear end. This makes the viewing end of the scope. This is where some pre measurements are needed. Since I +/- 10mm for focus, I had to ensure I get the focus length of this scope taking into consideration the main tube body, the reducing collars length, the screw in 1.25" reducing collar length and the CCD of my MEADE DSI! That done I +/-10mm again to play safe. Since I have a screw in/out view tube, I'm ok here.

Image

4. The insides painted Matte black!

Image

5. The 2 scopes together. The 'PINK' scope has the screw in/out 1.25" collar inserted. The other 1.25" collar is next to the Guide scope. If you look closely you would notice it's shorter in length. I kinda miscalculated and since I didn't wanna pull everything apart, I just shortened it to fall into the focus length!...hehe Opps!

Image

6. What the whole set up looks like from (left) 50mm collar to main tube, 40mm collar and 40mm reducing collar inserted + 1.25" screw in collar at rear end!

Image

7. The whole scope with the MEADE DSI slotted in! Early Test run! Everything fit snugly....Phew!

Image

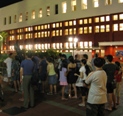
Eager to test it on some stars, but as we all know, it's been cloudy! So propped it on a tripod and tested focus at a Condo window approx 100M away at 10pm. Ran Nebulosity and adjusted the screw viewing end till I got a reasonable image. Took a shot and here it is;

Image

It's not upright as I have yet to make a mount for it. Overall I'm pleased with it and though it doesn't have quality, or quality optics, I would believe I can get some stars through it! After all, I'm gonna use the scope with the DSI and run PHD for guiding. So I should be able to have PHD pick up something for guiding use....just need a clear night to run a final test!

Still to complete would be a DIY saddle of some sort so I can mount it to my 80ED or even onto my C8. Weight wise is around a small compact Digi cam. Then it's clamp down focus with a locking screw through to lock the end collar in place! Drill and tap the end collar to run a nylon screw to hold the DSI....and then it's complete. Oh yeah....a nice coat of paint I guess!

Well there you have it....my Cloudy night DIY. I enjoyed sourcing the materials, the process of fabrication, the focus frustrations and the sawing leaving PVC bits all over my balcony floor!! Awaiting to test it on any darn star once it clears!!! Will report when I can do a final test and if it works guiding! Till then, any questions please feel free to ask.

I hope you enjoy reading this and gave you some ideas if needed! Thanks!
User avatar
cataclysm
Posts: 1024
Joined: Mon Aug 29, 2005 11:23 pm

Post by cataclysm »

Hey very impressive! Nice work! Looks like it can be a very competent guide scope. :)
User avatar
Gary
Posts: 3790
Joined: Tue Sep 30, 2003 7:06 am
Location: Toa Payoh
Contact:

Post by Gary »

Nice! Thanks for sharing.
User avatar
orly_andico
Posts: 1616
Joined: Sun Aug 09, 2009 11:14 pm
Location: Braddell Heights
Contact:

Post by orly_andico »

Where can we get PVC pipes in small lengths? I was of the impression that you need to purchase a huge length which is a pain to take home...
User avatar
timatworksg
Posts: 767
Joined: Mon Feb 01, 2010 9:42 pm
Location: Pasir Ris

Post by timatworksg »

Well still cloudy so no chance of a test yet. Only painted my daughters scope 'PINK' and fitted the bino EP. If she doesn't play with it I'll convert it into a finder scope...lol!
Still pondering on a mount design for it. I have some collective possibilities which I'm tinkering with so it can adapt to a refractor's OTA rings as well as an SCT without any hassle yet remain reasonably weighted to not add on too much to the overall payload.

@cataclysm:
Thanks! So far all seems promising and I'm optimistic. Since it's a Meade DSI stuck on, I should think it'll have no prob locating something to track and guide. Plus with PHD it makes it all easy, even with out-of-focus stars. So far it seems competent enough....will update when I final test are done!

@Gary:
Thanks bro! Hows your scope so far??....Enjoying every minute of it I'm sure!

@orly:
If you head down to well stocked Hardware stores (those that cater to contractors) you can purchase lengths from 1/2M to 1M. You don't have to buy the whole long length. Even if you do, you can get them to cut it down to carry size, tie them up and plop them in a bag! You could try hardware stores in Housing districts,...they sometimes have short lengths though limited. Most are willing to part with 1M minimum,...unless they have scraps. Though you only end up using less than a foot, sometimes the extra lengths are good for mistakes, improving on another, or make a small short umbrella tube (cap one end with glue and cap the other end without-buy those small short hand bag umbrellas and when your out or in a car during the rain, you can shove the wet umbrella into the tube and no worry about dripping water! Once your home or somewhere convenient, drain the water outta the tube..hehe)
Back to the PVC tubes,...prepare to spend some time testing and planning while you search for elbows, collars, etc etc. Most PVC collar dimensions are external. So a 1.25" collar may not fit a 1.25" EP. Hence the velcro, rubber, etc to fill those gaps! I did alot of legwork from several shops for collars,...not everyone stocks exactly what you need. I always go to the one at Loyang (64+4)...it's Tools 'r' Us!!!
My wife never complained about how much time, effort & money I spent on my Astronomy hobby!................suddenly I met her!!!
User avatar
timatworksg
Posts: 767
Joined: Mon Feb 01, 2010 9:42 pm
Location: Pasir Ris

Post by timatworksg »

Finally a nite worthy of some Obbing!! Clear skies (well pretty good by most standards), Stars bright!,....and dinner plans (arrrgh!) But before I left for my appointment, I set up to do a quick test with the guidescope. Here are some pics and details. It's set up on my 80ED and Vixen GP mount. Mounted it forward off scope to add some weight when the DSLR hooks on!

Sorry for pic quality. Was rushing and didn't plan much! was more eager to see the results of the DIY!

1. How the scope will be set up. On the fore of the WO mounting rings into one of the screw holes! The clamp cost $2.80 and it's a heavy Duty Hose clamp. Main tube got a good spray of Orange! The hood's black color was a little sanded down to make way for some new black paint.

Image

2. Close up. Thats the clamp which has a layer of Velcro stuck on the inside to give some grip. I'm gonna change to a thin layer of rubber once this DIY is finalized. Also another nut that will tighten itself on the screw shaft against the mounting ring. That way the whole guidescope will stay put!

Image

3. Side view close up!

Image

4. The result in PHD during 'capture' stage. I'm pleased when I saw this.

Image

So in the end, I'm happy that it worked out!! The scope did do it's part and PHD had no problem calibrating and getting the green box and crosshairs onto a selected star. I didn't want to place any additional screws on the hose clamp as I wanted to experiment with the scope pointing straight and perhaps grabbing one star for PHD to use.

All thats left now is refine the focus, finish off the black hood paint job and improve the Hose clamp with a lock down nut to hold onto the WO rings and the cushion on the inside clamp. Gonna give the guide scope a clean up thereafter and then it's a keeper!

Oh yeah,...still have to test the tracking! Didn't get a chance to fully test it out. This was just to see if PHD could hook onto a star the DIY scope could see. Which it did...phew! It was off to dinner so when I get the chance, will be eager to do just that. Then it's checking for any PEC and backlash. Little by little, step by step.
User avatar
orly_andico
Posts: 1616
Joined: Sun Aug 09, 2009 11:14 pm
Location: Braddell Heights
Contact:

Post by orly_andico »

@Tim, how are you driving your mount from your PC? shoestring astronomy GPUSB?
User avatar
timatworksg
Posts: 767
Joined: Mon Feb 01, 2010 9:42 pm
Location: Pasir Ris

Post by timatworksg »

Currently it's the DSI into the laptop, thru PHD and out to the IOptron Hand box. My Vixen GP is fitted with the IOptron EQ conversion kit. It communicates via ASCOM. Prob I had initially was my laptop runs Win7 64bit and Meade DSI's don't have 64bit drivers! To solve this was to install VMplayer, which is a virtual machine allowing me to install XP and run it (my win7 is the home version, higher win7 versions can download the microsoft VM for XP).

I still have a few things to check when I get the chance to fully test it out. Communicating between the DSI-PHD-hand box is no prob. Fooling around with some settings in PHD to compensate for backlash/PEC/etc etc need to also be done. That and a properly aligned mount, plus the overall weight, etc etc...lol! I normally do drift align but this little project for me was to have fun, make something that could work and help. SO far the scope picks a star up well enough. Now it's the software tweaking and overall weight distribution issue!
My wife never complained about how much time, effort & money I spent on my Astronomy hobby!................suddenly I met her!!!
User avatar
timatworksg
Posts: 767
Joined: Mon Feb 01, 2010 9:42 pm
Location: Pasir Ris

Post by timatworksg »

Latest update:

Took the lens out and sanded the whole unit again. Gonna do some minor adjustments in shortening the tube by a few mm so I have some more focus adjustment possibility. Then it's refine and stabalize the Hose clamp and improve the locking nut when attached to the WO mount rings. Finally tap the locking screws to hold the DSI and then it's final test!

Searching through my Smaller Dry Cabinet and found way behind a never used 70-300mm Nikon 'G' zoom. Came free with a camera I bought long ago. Never liked it's image quality hence it got lonely. Hmmm,,....made me think how I could disable the aperture shutters and mount the DSI?? hehe! Would be cool to have a smoother focussing scope. Heck,...if the Mag is good I could take moon shots!! Well, it's think, think, think! Will update!

Thanks to all thus far for the kind words and encouragements!
My wife never complained about how much time, effort & money I spent on my Astronomy hobby!................suddenly I met her!!!
User avatar
timatworksg
Posts: 767
Joined: Mon Feb 01, 2010 9:42 pm
Location: Pasir Ris

Post by timatworksg »

Ok..latest update!

Finally had some time to test my guider out! Finalized the Guidescope mounting and attached it to my 80ED. Set up EQ mount with rough South Hemisphere alignment with aid of compass at Balcony. Balanced scope with eveything on, started up the IOptron unit and did a 2 star alignment. Was a little off, but didn't care as this was a test. Selected and slewed to Jewel Box and it was in the EP view but not exactly centered.
Swung around to the star 'Shaula' for the test. Centered the star and shoved the DSI into the guidescope. Started PHD and did the calibration. Within approximately 10secs, I got an image of a few stars. Selected one, green square appears, started guiding in PHD. Selected AutoGuide in the IOptron handbox and waited. PHD was configuring itself and finally green square and crosshairs!! Checked status info and it was Guiding! Listened to mount motors and I could hear them whirring periodically adjusting themselves!
Took some test DSLR shots at prime (10s, 20s, 30s, 40s) and they all showed nicely rounded stars!! Wooopeee!!! Very slightly elongated due to a bad selection of guide speed on the handbox. IOptron has 4 speeds,...Still need to test those out now that I know it works!

Repointed the scope somewhere else, re-started PHD, did the same thing and I got green square and crosshairs!! Overjoyed...I now have a guidescope..though small one..lol!

Decided to do the ultimate test of some AP!! Looked at PHD screen and it was flashing!! Screen grey! Look at sky,...clouds!! sigh***
So tore down and live to fight another day! Will post pics on the guidescope DIY mount and how the set up is!

Incase anyone is wondering,...the DIY scope is using a Meade DSI ccd cam which is USB to my laptop. Read by PHD which communicates via ASCOM to the IOptron 8401 handbox unit via USB connection! It is possible with the 8401 handbox to guide via ASCOM thru the USB cable supplied. All that was needed is to install the IOptron ASCOM driver, the ASCOM package and ensure a port has been assigned. I updated the handbox and hence comms was established. PHD could detect with no prob. I run VMPlayer on my Win7 (64bit) laptop to enable me to use WinXP. meade and some programs don't run on 64bit nor win7...grrr! Just make sure you install everything into WinXP.

cheers: Tim
My wife never complained about how much time, effort & money I spent on my Astronomy hobby!................suddenly I met her!!!
Post Reply