Next up is the Weather Station. I'll describe the physical devices here and talk more about the weather safety monitor in a later post.
I based this project heavily on
https://github.com/manojkoushik/Arduino ... Conditions. It comprises of the Arduino Sketch, the ASCOM driver, and a Windows application to view the data.
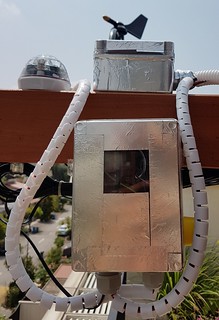
The Arduino was constructed using an Arduino Uno, Sparkfun Weather Shield, and an MLX90614 IR thermometer. The Weather Shield provides data such as pressure, humidity, ambient light, and, when connected to the anemometer, provides wind speed and direction data. The image below shows an early hookup of the system without most of the wires.

The anemometer used is the Davis anemometer. Some information on the physical hookup is available at
http://cactus.io/hookups/weather/anemom ... anemometer. Connecting to the weather shield required a modification of the wiring and a change in the code since the circuitry on the shield was designed for a different anemometer.
The IR thermometer is used to measure the temperature of the sky. When it is cloudy, you might have noticed that it is generally warmer than when the sky is clear. This difference between ambient and sky temperature can be used to estimate cloud cover. I have found that a difference of about 8 deg C or below corresponds to overcast skies while 12 deg C (the biggest difference I have recorded) corresponds to clear skies. You can see the connection to the IR thermometer fitted into a hole drilled in the box.
The Arduino is also connected to an Hydreon RG11 rain sensor (the dome shaped device in the image below). This is a neat little rain sensor that can be adjusted to be very sensitive to water droplets. It is also something that won't corrode easily unlike other types of rain sensors.
The Arduino is hooked up to the PC and the ASCOM driver is used to connect to it. The driver was slightly modified to adjust the format of the file output and the logic to determine some of the output flags, e.g alert status. This driver will be used by applications, including SGPro, to read the weather data.

Why did I go down the route of building one? Well, aside from liking to tinker with electronics, the project cost less than SGD 350. Compare that to a Boltwood Cloud Sensor (USD 1,795) or the cheaper SkyAlert (USD 749)...