Excellent explanation on drift alignment, thanks for the link
JY
polar alignment
cheap software for drift alignment using webcam: http://wcs.ruthner.at/index-en.htm


it's not practical to use a finder for drift alignment...
the best drift alignment tutorial i find is:
http://www.petesastrophotography.com/in ... nment.html
you can practice on the drift align simulator. just make sure you set to the right type of scope you'll be using for real.
http://www.petesastrophotography.com/tu ... ngsim.html
the best drift alignment tutorial i find is:
http://www.petesastrophotography.com/in ... nment.html
you can practice on the drift align simulator. just make sure you set to the right type of scope you'll be using for real.
http://www.petesastrophotography.com/tu ... ngsim.html

back to the same topic of polar alignment AGAIN!
can anyone explain to me what the 3rd pic is talking about? under the part "UNDERSTANDING HOW IT WORKS"
http://www.petesastrophotography.com/tu ... nment.html
also which stars do you guys choose for your polar alignment?
can anyone explain to me what the 3rd pic is talking about? under the part "UNDERSTANDING HOW IT WORKS"
http://www.petesastrophotography.com/tu ... nment.html
also which stars do you guys choose for your polar alignment?
If you have a camera that has exposure of over 2 minutes, you can do the "digital" way of alignment.
Instead of using an illuminated recticle, I use my DSLR camera to do my polar alignment.
Here is the way.
1) Attach your camera to your telescope, like you do when taking images. Focus as good as possible.
2) As with the manual alignment, place a star near the zenith in your camera field of view. Set your exposure around 200ASA (too high ASA, stars may be washed out).
The total exposure time is 2 mins and 10sec. First 10 seconds of exposure, just leave your camera and the mount drive on.
For the next 60secs, press either RA+ or RA- button with 2x sidereal speed. After 60secs, press the other way.
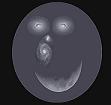
You should get an image such as these.
Your first image may be similar to the one on the left. As you can see, initially the star is on the left side, but after 2 minutes, the star has drifted to the right. Don't worry about which direction the star move, either N, E, S or W. Just adjust the polar axis of your mount, slightly to the east or west. Then repeat the procedure. You can stop the alignment process when you only get a straight line, and not "v" shape.
You can do the same thing for declination alignment. Just point your camera as near to the eastern or western horizon.
Instead of using an illuminated recticle, I use my DSLR camera to do my polar alignment.
Here is the way.
1) Attach your camera to your telescope, like you do when taking images. Focus as good as possible.
2) As with the manual alignment, place a star near the zenith in your camera field of view. Set your exposure around 200ASA (too high ASA, stars may be washed out).
The total exposure time is 2 mins and 10sec. First 10 seconds of exposure, just leave your camera and the mount drive on.
For the next 60secs, press either RA+ or RA- button with 2x sidereal speed. After 60secs, press the other way.
You should get an image such as these.
Your first image may be similar to the one on the left. As you can see, initially the star is on the left side, but after 2 minutes, the star has drifted to the right. Don't worry about which direction the star move, either N, E, S or W. Just adjust the polar axis of your mount, slightly to the east or west. Then repeat the procedure. You can stop the alignment process when you only get a straight line, and not "v" shape.
You can do the same thing for declination alignment. Just point your camera as near to the eastern or western horizon.
You do not have the required permissions to view the files attached to this post.