Hi guys,
Would just like to share with u my 1st successful attempt at DSO.
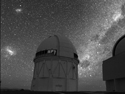
Both Pics were taken using the following settings, with the D70, hyperstar n 11" SCT
10x20s
ISO 800
F/2
My 1st DSO
My 1st DSO
You do not have the required permissions to view the files attached to this post.

![[smilie=good-job.gif]](./images/smilies/good-job.gif "good-job")

Nice attempts for a first!
M31 might endure a little bit of stretching to reveal the overal structure more plus the satellite galaxy at the top right. Like the way the stars are as it is, nice and spherical.
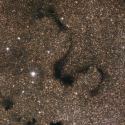
The dumb-bell close-up has good colour. Hard to believe it is shot in Singapore no? Perhaps a litte out of focus, but this could also be due to external pertubations. It can be further improved by executing the minimum filter on the stars alone to reduce the star size slightly.
Interesting to find out how is the vignetting profile for the Hyperstar+D70 combi....
Cheers!
M31 might endure a little bit of stretching to reveal the overal structure more plus the satellite galaxy at the top right. Like the way the stars are as it is, nice and spherical.
The dumb-bell close-up has good colour. Hard to believe it is shot in Singapore no? Perhaps a litte out of focus, but this could also be due to external pertubations. It can be further improved by executing the minimum filter on the stars alone to reduce the star size slightly.
Interesting to find out how is the vignetting profile for the Hyperstar+D70 combi....
Cheers!
Hi all, thanks for the comments and thanks Remus for the advice and tips. How do u do min. filter on the stars?
Pic is taken in the US, but its along a roadside where there is still light pollution.
I've attached the original image of m27. Not sure if the dark edges are what u call vignetting? Cos' I though u shouldn't be able to see stars if its vignetting?
someone do correct me.
Thanks.
Pic is taken in the US, but its along a roadside where there is still light pollution.
I've attached the original image of m27. Not sure if the dark edges are what u call vignetting? Cos' I though u shouldn't be able to see stars if its vignetting?
someone do correct me.
Thanks.
You do not have the required permissions to view the files attached to this post.
oxygn, you can reduce (or sometimes known as 'spherize') the stars by using the minimum filter in photoshop. This helps to reduce the effect of blob-like stars and increase their 3D profile. Also, the reduction of the star size helps to bring attention to the planetary nebula in a subtle way as well.
Steps to performing the minimum filter method on the stars in PS:
1) We need to select the stars first. Use the Magic Wand with tolerance around 16, and select a sizeable star sample on the cropped image. After that, access SELECT->SIMILAR to expand the selection to the other stars. It will be helpful to feather a bit, to soften the minimum filter effect which will be applied later, via SELECT->MODIFY->FEATHER. From the above image, a feathering amount of about 1 pixel (or 2) will do.
2) Execute the Minimum Filter from FILTER->OTHER->MINIMUM and use a pixel radius of 1. This will effectively be too much of a reduction effect on the stars. So after executing this filter, we will fade the effect of the filter significantly using EDIT->FADE and vary the opacity amount to your taste. Remember this method should be exercised with subtlety as it can be obvious to the viewer if the filter is excessively used.
As for the vignetting, it is normal but considering the generous size of the D70 chip, and the fact that the vignetting can be removed by employing gradient removal methods, you have quite a nice setup there!
Keep shooting!