Jonarsh wrote:Amazing!! Can you share how you took it?? I'm very very interested to learn how to take nebulas and stars next.....
Post is rather long..
Workflow for imaging Nebula aquired using CCD Camera as follows.
A. Mount and Scope set up.
My set up is permenant and so every time I do not have to do drift alignment. It saves a lot of time.
I use Orion Atlas (Eq6) mount and Sky watcher ED 120 doublet APO (FL.900 mm) . Mount is controlled by EQDIR .
Guiding is done through Megrez 80 SD (FL 480 mm)scope and Meade DSI using Pulse Guiding through EQDIR.
Depending on image size , I also use a Meade 0.63 focal reducer to bringdown the FL of main scope to about 570 mm or so, (Not sure though!).
B. Aquisition of images.
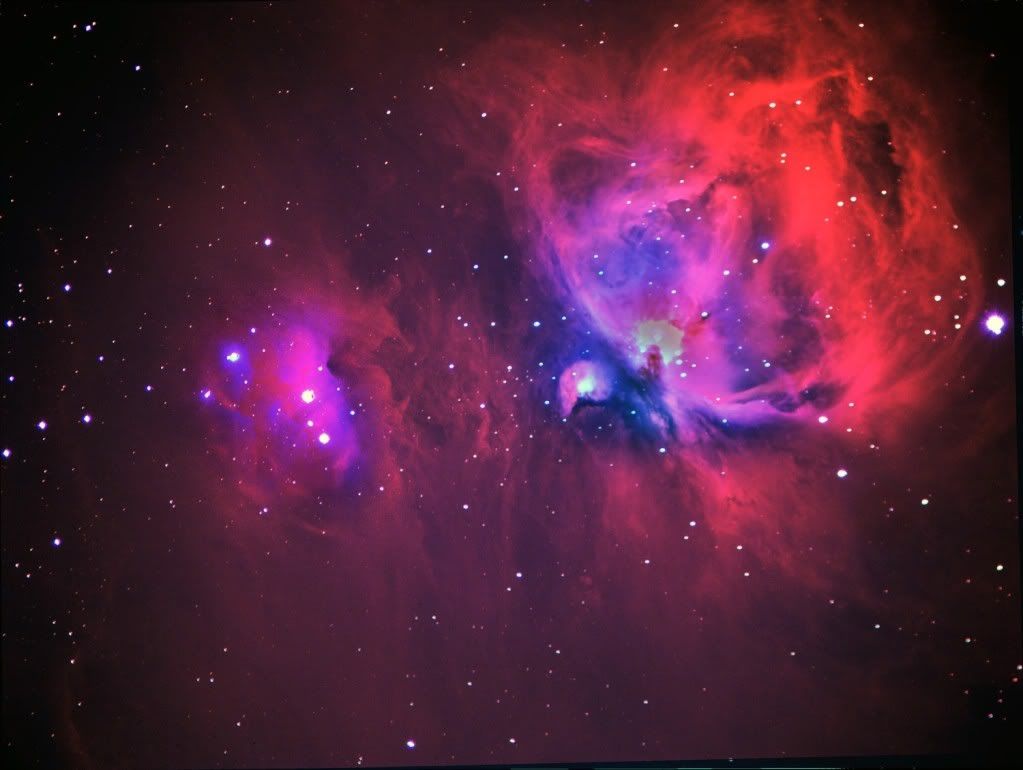
In Singapore, bright nebulae like M 42 can be imaged using LRGB filters.
For faint nebulae imaging Narrow Band filters is the only choice.
For above image I have used LRGB filter images of 30 and 60 seconds and H-alpha images of 600 seconds were used.
Currently I take a total of about 60 to 90 minutes for LRGB, about 3 hrs for Ha-LRGB and over 4 hrs for Ha-O3-S2 images. I have not tried more than 1200 secs for a subframe.
C. Work flow as follows.
1. I use CDC and Eqdir for GOTO and for centring image.
2. PHD pulse guiding is used for guiding. The graph feature of PHD is extremely useful for monitoring the quality of guiding and adjusting the pulse guiding width on the fly. I normally do the Guide star calibration near to the image to be captured.
3. Camera used is QSI583 WS CCD. I have resisted the temptation of going down below -10 Deg Celcius.
4 Camera contol is by Maxim DL 5.18.
3. Focusing is done using above software . Normally I stop when the FWHM is below 3 on a moderately bright star in the visinity of nebula to be imaged.
5. Normally I set the program to the various exposures and monitor the progress every one or one and half hour.Thus I am free for doing something else. Usually every thing will be OK if huge clouds do not block the Guidestar for long duration. Brief interruptions are not a problem for PHD.
6. CCD takes the images in FITs format. a 1200 Sec image can easily be over 16 Mb.
D.Initial processing.
7. Initial Calibration and processing is done using Maxim DL. So far I do only dark Frame calibration . Not yet come around to using Flats and Bias.
i)Dark frames are aquired in Maxim during spare time . I use 5 to 9 Darks for calibration.
ii)Next step is quality measurement of images. I reject images with "roundness" more than 40%, normally.
iii)Next step is alignment for which I use "auto Star matching or "manual two star matching".
iv)Next is color balancing which I use only for RGB at 1: 0.8. 1.25, weightage normally.
v) Next for Combining, I choose Sigma combine normally or Median combine rearely.
vi)Next, the combined file is saved as a .FITs file and a 16 bit Tiff file (for Photoshop processing).
vii)Occasionally I do a initial stretching after combining , using DDP on maxim.
viii) In case of NB imaging, aligning and combining of Ha, O3 and S2 images are done separately.
E.Processing in Photo Shop (CS4)
8.i). For LRGB: It is strait forward . I do mostly streching, in stages, using "Curves" , alternately adjusting "Black Point" in "Levels".. This can be done on idividual channels of RGB as required. This is the most important part of processing where the finer details emerge.
ii).In case of Nebulae with bright core , as M42, selective darkening of bright areas using Curves and feathering will be required.
iii). Finally before leaving Photoshop, "Unsharp masking" may be done if required to sharpen the lines.
iv).The image is then stored as a PSD file and JPEG file for web.
9. If some diffraction spikes are to be added on stars, "Noel Carboni's "Action Tools" are used before leaving Photoshop.
10.JPEG file is then processed if reqired to reduce "noise" using "NOISEWARE", which is a freeware.
11. Combining NarroBand images in PhotoShop are much more involed than LRGB processing.
i). For this,the separately combine images (see step 7 viii ) of Ha, O3 and S2 images are separately stretched in Photoshop as described in section 8 i) and ii) above.
ii). Then it is taken back to Maxim and aligned using "Manual 2 star matching".
iii) These aligned images are then opened in Photoshop again and combined using "Clipping Mask" method , where colour allocation and lot of other refinement can be done.
iv) Remaining processing is done as 8 iii) , iv) , 9 and 10.
For NB images , colour allocation can be done in many combinations. Also using "Clipping Mask" is just one of methods . There are few other methods also available for NB image blending.
NB imaging may appear daunting, at first, but once you get the hang of PhotoShop, it is quite interesting.
Processing of one-shot colour camera images are comparatively easier as camera does most of the jobs for us.
Kochu/12-3-12
![[smilie=admire2.gif]](./images/smilies/admire2.gif "admire2")