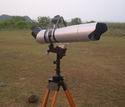
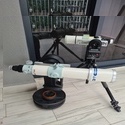
Vixen Polarie Set up by tuna7777, on Flickr
Equipment List
1. Manfrotto 410 Junior geared head with only two axis. I removed one axis to lighten it. Instructions to remove the third axis are here http://toast-tech.com/enjoy/s10.html. Most likely you will void your warranty by removing the axis.
2. Benro Gimbal Head (bought this used on clubsnap – a great place to look for bargains if you are fast). Got the idea from the Toast Pro mount. Pros- provides independent adjustment of the two axis for pointing the scope. Cons- adds weight, and there is a image shift when you tighten so you need to compensate. Lastly, at certain angles, one of the knobs will hit the latitude adjustment knob on the manfrotto. If you are comfortable using a regular ball head then give this a miss.
3. Vixen Polarie Star Tracker mount with Vixen Polarmeter
4. Canon 500D modded with Borg 45 ED (older f6.6 version), estimated focal length 270 mm with F 5.6 with 0.85x focal reducer 7885.
5. Laser pointer in Scopestuff mounting attached to hotshoe of camera. Great for getting to targets but can easily shift out of alignment because its secured by one footing. Also laser does not work in really cold weather. Am on the lookout for a mounting that uses a cable to turn on the laser so that you arent fiddling with the laser.
6. Right angle view finder attached to the camera viewfinder. On many occasions, the camera is upside down, and this view finder fell out. Mine has a cracked glass internally but still usable. Is useful for framing and focusing with your eyes.
Total Weight of above equipment plus tripod, a couple of eyepieces, batteries, chargers, cables, small diagonal comes up to 7.1 kg. Most airline allow max 23 kg one piece, so this will take up 1/3 of your total weight.
If you add netbook which I used for Backyard EOS program to check for drift alignment, it will add another 1.5 kg to your total weight.
I had a chance to try this setup recently in New Zealand and with a limited time given, took the following two pictures. Subs were acquired using Backyard EOS which costs $$ money to buy (http://www.backyardeos.com/) and stacked in Deep Sky Stacker which is Free (download here http://tech.groups.yahoo.com/group/DeepSkyStacker/
Learn how to use it here http://asignobservatoryii.webs.com/tutorials.htm)
The photos were taken at Wild Earth Lodge B&B , Makarora Valley, South Island, NZ. They have a self contained converted barn that can sleep 6 persons. Great views and great hosts!
Large magellanic cloud and tarantula nebulba – Total exposure 12 mins with 40 sec subs at ISO 1600. This image is as you see taken with the Borg ED45 at 270 mm fl. No cropping.

Large Magellanic Cloud and Tarantula Nebula by tuna7777, on Flickr
Horsehead and Flame Nebula
Total exposure 14 mins, 60 sec subs at ISO 3200

Horsehead and Flame Nebula by tuna7777, on Flickr
Both pictures are not ideal – as they are grainy and could do with more and longer subs, lower ISO but this wasn’t an astrophoto trip and I didn’t have a lot of time. It didn’t help that the sun sets at 10 pm and I have to be up early in the morning.
But I am hopeful that I can get better subs as the alignment to the southern pole was done on the rough and I did not drift align at all. For Part 2 of my post, I will describe the steps I took to get the rough polar alignment. When I do get a chance next time, I will drift align for longer subs.
![[smilie=angel2.gif]](./images/smilies/angel2.gif "angel2")